Network
Wireguard VPN

Wireguard VPN is a great and reliable option for your own VPN server. Wireguard doesn't rely on a centralized server but on a peer-to-peer perspective. It is also an easy-to-use and setup environment. This tutorial is highly based on Stephen Herber's blog which, unfortunately, isn't available anymore, but you can still find using Waybackmachine's archive.
My internet provider does not offer a public valid IP address, but an IP behind a CGNAT network. This means that it is impossible to reach my premises directly from the Internet. To overcome this, I'll use my always-free Oracle's Cloud VPS as a middleman between my premises and remote hosts.
Table of Contents
- Network Topology
- Installation
- Authentication
- Wireguard configuration
- Firewall and VCN
- Home gateway configuration
- Laptop and Android
- Wiring up everything
- Testing
Network Topology

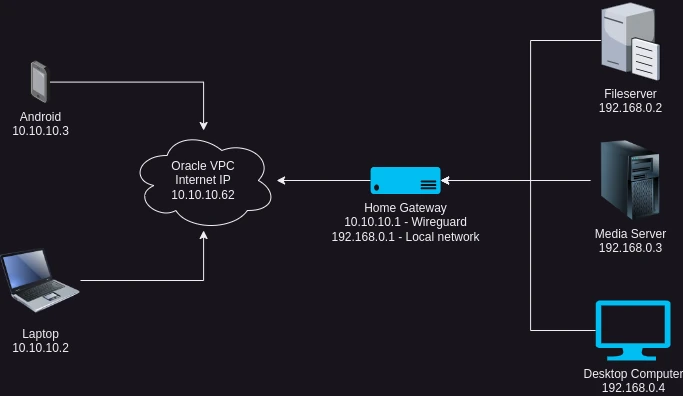
I'll use the 10.10.10.0/26 network for Wireguard.
- 10.10.10.62/26 - VPS at the cloud with a publicly available IP address. This will be the server all remote hosts will connect to.
- 10.10.10.1/26 - Home Server/ Gateway with CGNAT IP, acting as a router for allowing access to my premises.
- 10.10.10.2 - 10.10.10.61 - Other remote hosts that I allow to access my home network.
- 192.168.0.1 - 192.168.0.254 - Home network.
Installation
The installation process varies depending on the Operating System or Linux distribution you're using. For the sake of this tutorial, I'll use Oracle Linux, which is a clone of RHEL and the basis for many other systems like Rocky Linux and Fedora using yum.
sudo yum install -y wireguard-tools
Authentication
Wireguard's authentication is done using a private/public key pair. Let's generate our key pair for every host on the Wireguard network:
wg genkey | tee private.key | wg pubkey > public.key
The command above will create the key pair for the peer. You can generate the key pair for every host you want to be part of the VPN network. In the example above, we generated the private/pub keys respectively at private.key and public.key files.
Wireguard configuration
After creating a pair for every host, it's time to configure our wg0.conf. The path for this file varies depending on the operating system. You can have a graphical interface or just a text file. As the private key will live in that file, remember to set the owner as root and permissions as 600 to /etc/wireguard/wg0.conf.
VPS configuration
Let's configure our VPS with its private key and the public key for the other hosts, as well as the IP addresses for every host on our Wireguard network.
/etc/wireguard/wg0.conf
#VPS
[Interface]
PrivateKey = <VPS private key>
Address = 10.10.10.62/26
ListenPort = 51820

#Home server/ Home gateway
[Peer]
PublicKey = <Home server public key>
AllowedIPs = 0.0.0.0/0 # Allow connection to premises.

#Laptop
[Peer]
PublicKey = <Laptop public key>
AllowedIPs = 10.10.10.2/32

#Android Phone
[Peer]
PublicKey = <Android public key>
AllowedIPs = 10.10.10.3/32
Allowed IPs define the network accessible behind that host. This can be a subnet or a discrete IP address. I like to set the address for every host.
Firewall and VCN
VCN
Despite being publicly available on the internet, the VPC does not have the public IP directly connected to it. Instead, Oracle Cloud, as many cloud providers do, creates a VCN (Virtual Cloud Network), attaching a public IP to it and routing only port 22 from this IP to the VPC to allow connection between you and the machine.
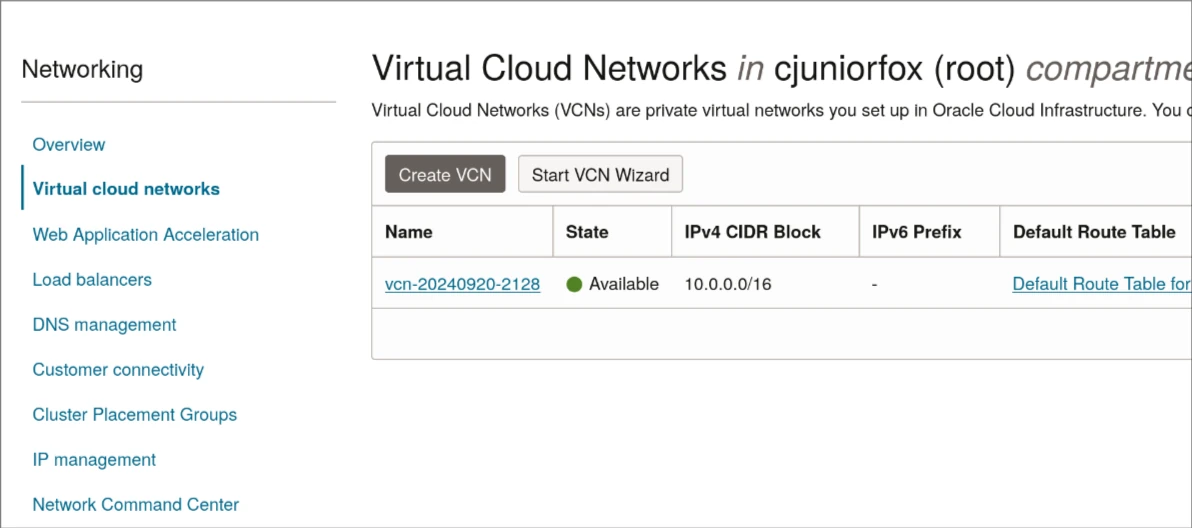
To make Wireguard available, it is necessary to route Wireguard's UDP port 51820 from the public IP to the machine. So, let's access Oracle's Cloud console, and navigate to Network and Virtual Cloud Networks.

There, you'll see the VCN created for your machine. Click on it. After, you'll see the subnets related to this VCN, click on the proper subnet, and then, you'll see your security lists. Click on the appropriate one.

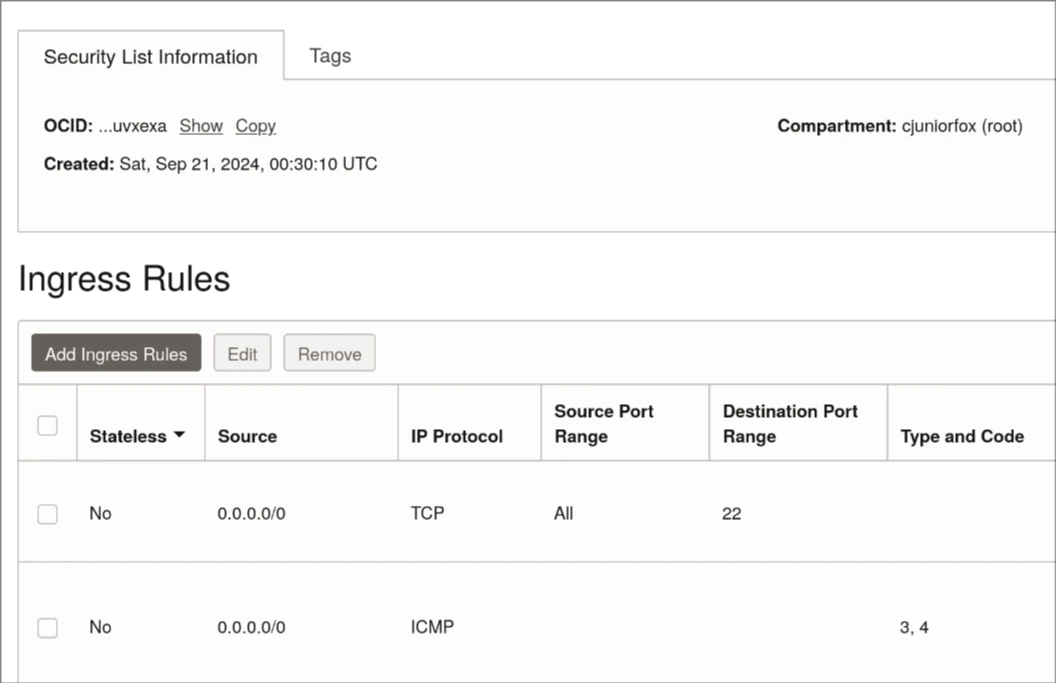
Scroll down a little bit until you see the Ingress Rules. Click on Add Ingress Rules. When adding the rule, set it as:
- Source Type: CIDR
- Source CIDR: 0.0.0.0/0
- IP Protocol: UDP
- Destination Port Range: 51820
- Description: Wireguard
Save it by clicking on Add Ingress Rule. The ingress rule will be part of the other Ingress rules.
Firewall
The route was created on the VCN, but it is also important to open the port on the VPC firewall itself. It's not hard work. Just a couple of commands in the terminal and we have the job done, but first, let's see what the VPC network configuration looks like:
ip --brief a
lo UNKNOWN 127.0.0.1/8 ::1/128
ens3 UP 10.0.0.240/24
Looks like I have a network adapter named ens3 with the LAN's IP address provided by Oracle Cloud. Let's see what firewall zone this interface relies on.
firewall-cmd --get-zone-of-interface=ens3
public
Great, the interface is tied to the public zone. With that in mind, let's add the Wireguard service to that zone.
firewall-cmd --add-service=wireguard --zone=public
Error: INVALID_SERVICE: wireguard
We have a problem. The wireguard service does not exist on firewall-cmd embedded rules. Let's create our rule.
firewall-cmd --permanent --new-service=wireguard
firewall-cmd --permanent --service=wireguard --add-port=51820/udp
firewall-cmd --reload
With our service created, let's add it to the public zone, which is the zone that adapter ens3 is part of.
firewall-cmd --add-service=wireguard --zone=public
firewall-cmd --runtime-to-permanent
Enable ipv4 forwarding
Our VPS is accepting connections but is not forwarding them. To do so, we need to enable ip_forward. Enable IP forwarding on /etc/sysctl.conf
echo 'net.ipv4.ip_forward = 1' | sudo tee -a /etc/sysctl.conf
sudo sysctl -p
The connections can be forwarded, but it is important to translate the addresses, so the hosts from one side can reach computers on another site.
firewall-cmd --add-masquerade --permanent
Home gateway configuration
My home gateway is behind a CGNAT (Carrier-Grade NAT), which means that my Gateway isn't publicly available on the internet. That's why I need to have a VPS on the cloud acting as a middleman between my premises and remote hosts and resources. This will act as a gateway to allow my remote hosts to reach my premises.
The VPN configuration will be the same as that of the other remote hosts. Have a look at the PersistentKeepalive key. The deal with it is to keep the connection alive due to the connection being dropped after a while.
/etc/wireguard/wg0.conf
#Home Server/Gateway
[Interface]
PrivateKey = <Home Server Private key>
Address = 10.10.10.1/26

#VPS
[Peer]
Endpoint = <VPS Public IP>:51820
PublicKey = <VPS Public key>
PersistentKeepalive = 25
AllowedIPs = 10.10.10.0/26
Laptop and Android
The configuration is the same as we did on Home Gateway. On Android Phone, you can generate your private key directly on the phone, or copy and paste the key generated on the server. I prefer to use the one I created on my server.
Be aware that these keypairs will allow access to local premises. So after configuring and connecting everything, it is good practice to delete those key files for security reasons.
wg0.conf
#Android Phone or Laptop
[Interface]
PrivateKey = <Android phone or laptop private key>
Address = 10.10.10.2/26

#VPS
[Peer]
Endpoint = <VPS Public IP>:51820
PublicKey = <VPS Public key>
AllowedIPs = 0.0.0.0/0
Wiring up everything
Assuming everything is configured as intended, let's connect everything. To do so, just run as a root user on every Linux machine:
wg-quick up wg0
For other OS, it will be a matter of clicking buttons or changing switches. You can also start the Wireguard connections on boot by enabling the systemd service module.
systemctl enable [email protected]
Testing
With everything connected and working, you will be able to test the connection between the hosts. You should be able to route connections between hosts and the premises through the VPS machine.
keywords: wireguard • vpn • oracle-cloud • linux • network • firewall